
The hexagons are piling up again on the workbench, which are leftovers from making hexagon pendants. We have hundreds of these slightly odd sized, but yet uniform bamboo hexagons. Ryan used a bunch for advertising tokens for his shop back in Week 30…I guess at week 61 it’s my turn!
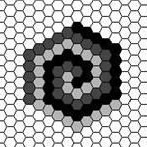 My Instagram “following” feed is inundated with hexagons thanks to the obsession with English Paper Piecing. I keep seeing the beautiful patterns people are coming up with for quilts, which is how I stumbled across the Hexagon swirls. The swirl pattern is perfect for a trivet, and I laid out the pre-cut bamboo hexagons according to the original “1 block” plan as posted. The design takes 75 hexagons, 25 in each color. Without colors, it was surprisingly hard to keep the design straight in my head!

All the hexes in the full sized trivet.

Stain testing. Now I kind of dig the red…next time!
I mulled over various ways to treat the hexagons to create the three colors / patterns, but in the end I settled on simply staining them. I really like the natural grain of the wood, and thought a stain would help that come through better than a paint, and possibly hold up to use a bit better. From an early “experimental” phase with our laser, I had a couple odd colors of stain chilling out in the garage (literally). The redwood, dusty green and white combo was a little more “Arts and Crafts Movement” than I wanted, so I ditched the red in favor of the natural bamboo.

Hexes in groups, ready to stain on their transfer tape. Current “paint station” is a tray table in my living room…I need a workshop!
There was so way I would sanely sane and paint all the little hexagons individually. To save my fingers some abuse, I laid the hexagons, in groups of 25, to the sticky side of transfer tape. It held everything in place while I sanded and stained beautifully!
I knew I wanted a boarder around the hexagon pattern to add stability and protection for the individual pieces. What I wasn’t sure of was how to get the correct measurements to make the border. I was worried that the spacing between the hexagons left by human hands / glue / etc, would make the design larger than if I had cut a border based on the original hexagon vector butted up to each other. Ryan was of course the voice of reason, trusting that the margin of wood burned away by the laser during cutting (also known as the kerf) would make up for any spaces I left in gluing.

Test chipboard border

Test chipboard border worked perfectly!
I knew I didn’t want the sawtooth edge of the hexagons on the edges of the finished project, so with a couple tweaks and an offset path, Ryan and I came up with this pretty mod looking 12 sided border. We cut it first of out chipboard, a cheap material that we bought for testing. Ryan was totally right – it worked perfectly with the laser kerfs. So I had my border and the outside shape for my base.
You might notice the final design is smaller than the original design. As I was laying out the colored hexies, I pretty much loved how it looked at every stage of building. In the end, I actually stopped a couple rounds short of recreating the full pattern, and only using 27 of the 75 hexagons for my trivet. The full pattern felt a little too large (especially with the yet unmade border) and by stopping there I could used the rest of the hexies to make a set of awesome coasters!
The base of the trivet is one solid piece, and is thicker than the 1/16th inch bamboo that the hexagons are cut from. Another bonus of setting up a vector file with the individual hexagons in it – I could engrave the design on the top of the base! It was great to have the guide there when I started gluing!

Starting to build the design, with the help of the engraved pattern underneath!

I liked this stage so much, I made them into a set of coasters!

It’s like the easiest puzzle in the world.

Trivet, pre border

This one isn’t lined up correctly, and it’s noticeable. Lesson here – too much glue can be a bad thing, and take your time.
I used wood glue for the assembly, and per the instructions, clamped them together and left them to dry for 30-60 minutes. Assembly was easy because I purposely didn’t want the graining or the brush strokes to line up. The rotation is pretty random, which I think adds visual interest, especially to the unpainted hexagons. I did get a little overconfident on the last coaster, using too much glue and moving too quickly – the layers became misaligned during when I clamped it. Whoops!
After clamping them for an hour, I finished the tops. I laid the stain on a little thick when painting, thinking I would do a quick sanding of the entire piece to fill in cracks and give the piece a uniform look. Well, that was a mistake. The stain didn’t work like I had expected (I thought it would penetrate a little), and it came right off on the edges of the hexies when sanded! There was no way I could fill in the bare spots neatly, so I sanded the whole piece and the trivet has a “shabby chic” look. I finished it by rubbing in mineral oil. Mineral oil is food safe, and there were concerns about the heat resistance of polyurethane. I didn’t want the finish to be melting on my hot pots and pans!

The shabby chic of over-sanding 🙂
Because coasters need to be less heat resistant, but much more water resistant, I did a coat of polyurethane. Even my mugs of tea are unlikely to be over 200 degrees, the recommended heat limit of the finished surface. The coating has a bit of a gloss, which looks quite nice. As I’m writing this post, they are doing a wonderful job of holding my glass of water beside me!

Finished set