
I’ve been working one some new designs based on quilt blocks that involve engraving to create a two toned design. Given that the engraved / unengraved area is roughly equal, I thought this would be a good time to test whether it’s better to paint first, then engrave away the color or surface you don’t need, or engrave first and fill in the engraved areas with paint.

Cut quilt blocks, with the transfer tape still in place.
During Week 24, we discussed why transfer tape was a wonderful time saving device when it comes to laser cutting. For Week 27, we used the transfer tape to personalize a wedding gift, engraving first, then painting. Week 56 was all about decorating clothes pins, one of which I prepped by painting first, then engraving designs.
The patterns I vectorized were classic quilt block: Old Maid’s Puzzle, Contrary Wife, Pinwheel, Ohio Star, and Hexagon Star. I made them jewelry sized – 1″ for the pendants and .375″ for the ones that were stud earrings.
To make the comparison a little more scientific, here are my 4 variable groups:

1 – Naked Quilt blocks, just the bamboo!
1 – Au Naturale – this is unpainted cut and engraved bamboo. You can see how the laser changes the surface of the bamboo when engraving. By its nature, the laser burns the softer wood rings faster than the hard rings – leaving the a more pronounced wood texture than the surface.

2 – Paint before engraving. These were probably my favorite. Easiest prep, easiest clean up and cleanest lines of the bunch.

This is the best shot I had of the gold painted wood before laser cutting – it was hard to tell the gold with the bit of shine. Regular bamboo ply is on the right.
2. Painted first – I had some lovely gold spray paint, so I applied three coats to an uncut piece of bamboo. It’s a little hard to see in photos, but it’s gorgeous. Shiny and metallic. I’m learning I really like spray paints, much better than acrylics at least. We then engraved away the areas that shouldn’t be painted.

3. Paint after engraving. The blue paint in engraved areas has an interesting weathered look.

Gold sprayed in the engraved areas. It’s not a smooth, shiny look.
3. Paint after engraving – to keep a constant, I used the gold again. To add some variety, I used my favorite blue acrylic paint on some. The paint was applied to the engraved areas only – unengraved areas were protected by a layer of medium tack transfer tape applied before cutting.

4. Two toned! Blue acrylic paint in the engraved areas, gold sprayed before engraving.

Gold sprayed on gold paint. It would have been the same effect as if I had just sprayed a plain one!
4. Two toned! – Getting a little crazy here; I wanted to see how it worked to combine the techniques. Theoretically, it should have lead to two neatly colored layers. The first layer was the gold spray paint. I did a second shot of gold paint post engraving on some; blue acrylic paint on others.
Things I learned:

Plethora of transfer tape
– Painting first is so much easier. Painting the uncut surface is neat and fast. It makes a cleaner line, and is much less work overall. Also, if you paint first, you don’t necessarily need transfer tape. Often times the soot cleans easily off of painted pieces, especially glossy paints. Peeling all those little transfer tape papers was about to make my eyes cross.
– I preferred the paint on the smooth areas. The paint simply wasn’t as vibrant in the engraved areas, where it was highly textured. (Another point in favor of painting it first!)
– Painting tiny laser cut bits with a brush is a PAIN. I had more paint on my fingers than the pieces, I swear. Also, excess paint went over the sides of the quilt patterns easily. When painting first, the original edges are cut away, leaving clean sides.
Stack of quilt block pendants – no paint, gold on gold and blue overpaint.
– Spray painting tiny laser cut bits was much more painless; the spray didn’t drip down the sides but rather speckled it. To keep them in place on the windy day outside, I stuck them to another bit of transfer tape (a method I used in Week 61: Hexagon Trivet) With both “paint after” methods, the sides did not stay clean.
– The two toned pieces were unique, but spraying gold on gold was a bit pointless 🙂
So, my advice is to paint first to save yourself a lot of headaches, unless it’s something precise and small (in respect to the total surface area), like a name.

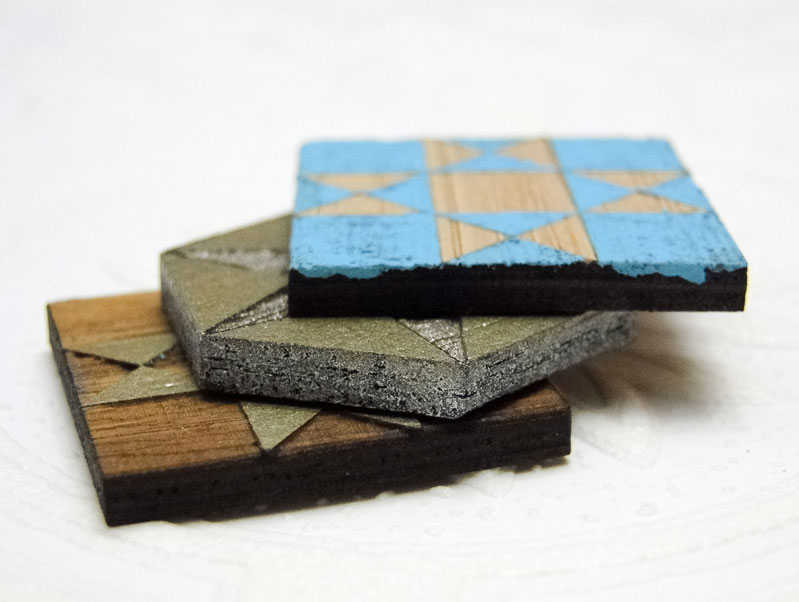
Side by side comparison, form the top to the bottom: 1) naked bamboo 2) gold painted before engraving 3) blue painted after engraving and 4) two toned
Lovely article, thank you! (altough I found it just now!).
I’m a beginner in laser cutting and I was wondering if there would be any danger in cutting wood that has been painted, but it doesn’t seem so. Did you use any special kind of spraypaint or was it regular, basic-craft-store paint?
Cheers!
You do bring up a good point – certain plastics have toxic off gassing. The layers are so thin, though, that any smoke from it would be minimal (make sure you have good exhaust!!). I’ve been using spay paint because the applications are thinner.